Fractal poster.
The full explanation of all the features of this program.
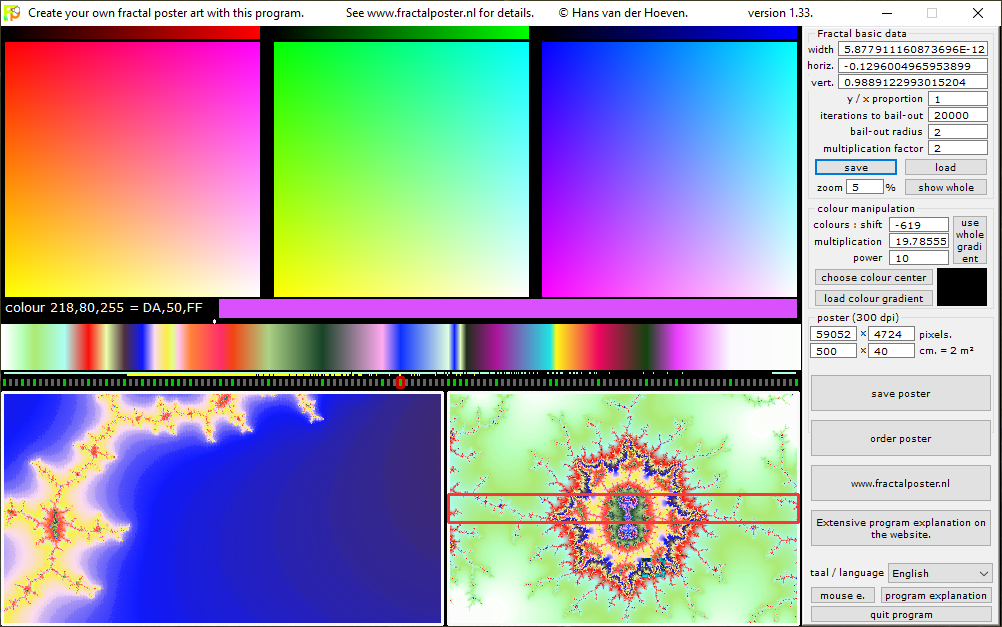
This is the main screen of the program itself. Click on any part of this image to jump to the explanation of that part.
Choosing your colors.
 Quite a large piece of the window is used for these color blocks. It makes it possible to have a good view on the possible colors and choose them with a minimum of mouseclicks.
You can choose a color by clicking anywhere in these three blocks. That color will be used in the gradient at the location of the 'hotspot' (see below).
Each large block represents one basic color. From left to right that is red, green and blue. Above each block you can see a small gradient in which you choose the amount of that basic color by left clicking on it. All the pixels in that block will have the same quantity of that basic color.
In the block itself you will then see all the possible combinations of that chosen value with the other two basical colors. So you can choose any possible color with only 2 mouseclicks.
If you are on this piece of the window with your mouse, you will see the colorvalues of the pixel beneath your mouse directly below these blocks.
The color beneath your mouse (or other information).
 Directly below the big color blocks you can see a colour rectangle like this one if you are on the part of the window which is ment to choose a color from. That is, when you are somewhere on the
color gradients with your mouse.
Directly below the big color blocks you can see a colour rectangle like this one if you are on the part of the window which is ment to choose a color from. That is, when you are somewhere on the
color gradients with your mouse.If you are on another part of the window, you can see some other textual information which depends upon the place and or action of that moment. It could for instance be the coordinates of your mouse within the fractal or a line which tells that the program has saved a picture or color gradient for you.
The color gradient as it will be used for your poster.
 This gradient holds all the colors which will be used for your fractal. On the screen it is approximately 800 pixels wide. But for the posters many more color values within this gradient will be used.
Below the gradient you see 132 little buttons. One of them is the 'hotspot', marked with a red rectangle, which is the place in the gradient which will get the new color if you choose a color with your mouse. You can make each of these buttons the 'hotspot' by leftclicking on the button. (You can also choose a color by leftclicking in this gradient itself). So, whenever you choose a color, it is placed in this gradient just above the 'hotspot', and also in the preview window and in the detail window (if that window is active).
The button itself will turn green, as an indication that that location in the gradient is filled with a color. You can remove a color from the gradient by leftclicking on a green button if that button is the hotspot.
Directly above the row with buttons you can see a yellow and a light blue intermittent line. The lightblue line shows you which colors of the gradient are used to create the preview window. The yellow line shows you which colors of the gradient are used for building the detail window. This yellow line will not be there if the detail window is not active.
You can save this gradient by rightclicking on it. The program itself shall give it a name and saves it in the folder 'gradients', which is in the same folder as the program itself. Directly above this gradient, on the place where most of the time the color band is shown, this name and location will be written.
The preview window.
 This is what it's all about. Here you choose which part of the
fractal you want to use to compose your poster with.
This is what it's all about. Here you choose which part of the
fractal you want to use to compose your poster with.The red rectangle is the part of the preview window which will be used for your poster. Therefore the proportion of that rectangle depends upon the poster you choose.
If you move your mouse across this window you see 4 little hooks and a rectangle moving with your mouse.
The four hooks determine the part of the preview window which will be your next preview window when you rightclick on this window. The size of the next preview window can be chosen by rolling your mousewheel, by pressing the up and down arrow keys or by directly typing in a zoom percentage in the 'Mandelbrot basics' section of the program in the top-right corner of the main program window.
While the program is calculating the new preview window, you see two large buttons just to the left of this preview window.
The topmost button says 'undo update preview window' By clicking on this button you go back to the preview window as it was before you clicked on it.
The other button says 'Stop update preview window' By clicking on this button you stop the calculation, but the program behaves as if that calculation was finished. This makes it possible to zoom in or out faster.
The little rectangle is the part which you can show in the detail window. This part is an exact piece of the poster you are making. The size of this rectangle is determined by the size of your poster. The bigger the poster, the smaller this rectangle will be. That's because the pixel size of this detail is fixed and the pixelsize of the poster depends upon your choice for your poster. By leftclicking in the preview window the detail will be shown just at the left of the preview window, in the detail window. While this detail window is calculated you see a big button in the preview window with the text 'stop update detail window' By clicking on this button, the calculation of the detail will stop, but the piece which is already calculated will remain on the screen. This can be very handy because it makes it possible to divide the detail window in different pieces next to each other and in such a way you can see how all of those details are influenced by choosing new colors by changing the gradient.
The detail window.
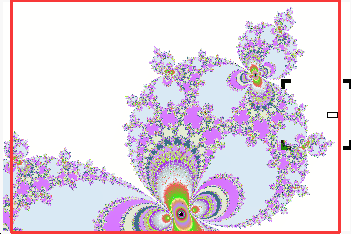
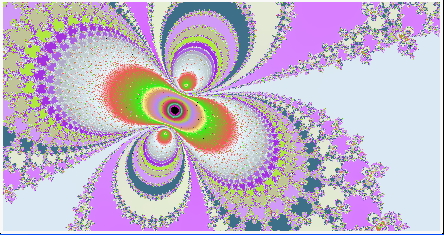 An example of the detail window. This window is created and updated by leftclicking on the preview window.
It disappears again if you change the preview window itself. Than you will see the textual information again which you saw when you started the program. It shows the parameters of the preview window. This is the same info as you can see in the right section of the program.
The basic information of your fractal.
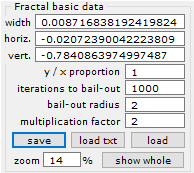 In this 'Fractal basics' section of the program you see the values of the different parameters as they are used to calculate your poster.
The topmost value, 'width' is the total absolute width of the preview window.
'horiz.' and 'vert.' are the absolute coordinates of the middle point of the preview window.
You can type in these three values here by hand. But usually you choose these values by right clicking in the preview window itself.
Then you get 4 values which you can only choose here:
'y/x proportion' gives the proportion between the horizontal difference between 2 pixels and the vertical difference between 2 pixels. Mostly this will be equal, so then it is 1.
'iterations to bail-out' gives the maximum quantity of calculations which the program will perform on each pixel. If the calculated value for that pixel rises above the value given in 'bail-out radius' before this quantity of calculations is made, that pixel is a part of the fractal and that value will be used to choose a color in the gradient. If the value of the calculation for that pixel stays below that value, that pixel is not a part of the fractal and that pixel will be colored with the color which is chosen as the color for the center of the fractal. The higher you choose this value, the more detail you get in your poster, but also the longer it takes to calculate your poster.
'bail-out radius' is the value which determines whether a point is seen as part of the fractal or not. For the well-known Mandelbrot, this value is 2.
'multiplication factor' is another factor used in the calculation, which has a great influence on the shapes of the fractal. For the normal Mandelbrot, this is also 2.
With 'save' your preview window as you see it on your screen will be saved on your disk in the 'fractal saved' folder. The name of the file will be shown just above the colour gradient.
'Load' makes it possible to reuse an earlier saved preview window. It will open a dialog box in which you choose the previously saved preview window as a jpg file.
'zoom xxxx %' is the relative size of the zoombox (= the part of the preview window between the four hooks.) in relation to the preview window itself. You can choose this value here, but also by rolling your mousewheel in the preview window or by pressing the up and down arrows on your keyboard.
'show whole' is the button which let's you zoom out to the whole of the fractal in your preview window. This makes it easy to start zooming in on another part of the fractal.
If you make any changes in one or more of these edit boxes, those changes will automatically be applied when the mouse returns back to the other part of the window.
This is where you spread out the colors in the poster.
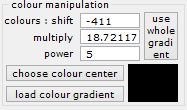 The calculation of the fractal only produces a heap of numbers. Here is the place where you determine how this heap of numbers is translated to a color from the gradient.
'colours : shift' is a value which will be added to the calculated value. This makes it possible to shift all of the calculated values within the gradient with the same value.
'multiply' is a value with which the outcome of the calculation is multiplied. This makes it possible to spread out the values more or less (or use the gradient more than once, because it is a looping system).
By clicking on the button 'use whole gradient' these two above mentioned values will be chosen automatically so that the whole of the gradient is used to create the current preview window.
'power' is the power to which the values of the calculation will be raised. This makes it possible to choose whether the gradient will be used linear or logarithmic or anything in between.
'choose colour center' opens a dialog window in which you can choose which color will be used for the pixels in the windows which are not a part of the fractal. This color is also shown as a rectangle next to the button (in this example it is black).
'load colour gradient' opens a dialog window so you can choose a color gradient which you have stored before in the folder 'gradients', or you can choose any image in the 'details' folder to reuse the gradient, used for that image. This last method only works if the associated text file with data is also in the same folder as the image you choose.
How large do you want your poster to be?
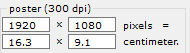 Here you can see which size your poster will become, both in pixels or in centimeters. Set any of the editboxes. The other one will be automatically updated.
Create Fractal art, order it or go to the website.
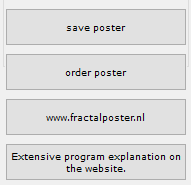 'save poster' makes it possible for you to calculate your own poster. But only posters up to 3000 x 3000 pixels will be completely calculated. Bigger posters will contain black lines
across the image. This is the limitation of this poster ordering program. But also the posters with black lines in them will give you a good impression of how your ordered poster will look like.
'save poster' makes it possible for you to calculate your own poster. But only posters up to 3000 x 3000 pixels will be completely calculated. Bigger posters will contain black lines
across the image. This is the limitation of this poster ordering program. But also the posters with black lines in them will give you a good impression of how your ordered poster will look like.Your poster will be stored as a bmp file in the folder 'fractal posters'. A little jpg version of the poster will also be stored in the 'fractal saved' folder, with the same name as the big poster, but with the extension 'jpg'. You can later reopen this little jpg preview to continue working on that same fractal. So you can, for instance, create the same poster again with different colours.
During the calculation of the poster you see in the line above the gradient what the name of your new poster is and how long it will take to complete your poster.
You also see two large buttons on top of the large color block in the middle (the green one).
The topmost button says 'cancel creating the rest of the bitmap.' By clicking on this button the program stops calculating the poster immediatly. But the part which was already calculated will be kept on your harddisk. It now is simply a smaller image. You can see how large it is in the line just above the gradient.
The other buttons says 'shut down the computer when this poster is finished' By clicking on this button you instruct the program to shut down the computer directly after this poster has been completed. If you have clicked on that button you will see another, even bigger, button with the text 'This computer shall shut down when this poster is finished. Click here to cancel this instruction.' In such a case you should make sure that there are no other programs active anymore which need the attention of the user before they can be shut down. They might prevent the computer from being shut down.
By clicking on this large button you cancel this instruction and you go back to the situation as it was just before you clicked the shut down button.
'order poster' is the button with which you can order your self designed poster as a large png file. If you click on that button, the preview window will be stored as a jpg file in the 'fractals saved' folder. And you will see all instructions on the screen of how to order your poster. That is, sending an email with the jpg version as an attachment and pay for the Fractal.
Then the full version of your Fractal poster will be calculated for you and you will receive a link to Wetransfer where you will be able to download that Fractal artwork. And then you will have your own unique artwork because we will never sell your creation to anyone else.
Language, explanation and quitting the program.
 In the dropdown box 'language' you can choose which language you want to use for the program. English and Dutch are always available. But the program looks in the folder
'language' for textfiles. Any textfile it can find there will be interpreted as a language file and will be shown as a choice in the drop down box. However, such language
files are not yet available. If you want to translate the program and make that translation available for others, just let us know, so we can provide you with the instructions on how to do
that efficiently.
In the dropdown box 'language' you can choose which language you want to use for the program. English and Dutch are always available. But the program looks in the folder
'language' for textfiles. Any textfile it can find there will be interpreted as a language file and will be shown as a choice in the drop down box. However, such language
files are not yet available. If you want to translate the program and make that translation available for others, just let us know, so we can provide you with the instructions on how to do
that efficiently.'mouse e.' is a button with which you can open a little explanation window in which a short description of the mouseclicks in the program is given. If you open that window, the text on this button will change in 'c. mouse' , so now you can close that window with this button.
'program explanation' opens an explanation window in which a general explanation is given of the program. You can close that window by clicking on the same button, which then says 'close explanation'.
Buy a poster